We will do a very simple Enterprise JavaBeans example: a stateless bean that will add two integer numbers. We will use Eclipse, but NetBeans is not so different.
First, you must pick the Java EE perspective on the right upper corner:

Next, you must create a new Java EJB project (File--> New --> EJB Project --- check the picture after this one) and select the Finish button in the bottom:


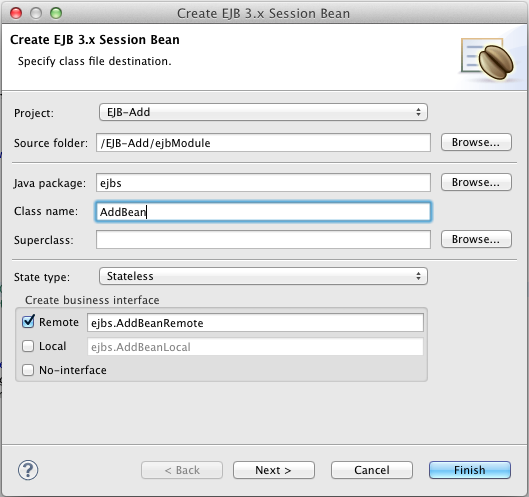
Next, you may create a new Session Bean, as follows (note the package ejbs):

You get the following window. Pick the appropriate options and press "Finish":
package ejbs;
import javax.ejb.Remote;
@Remote
public interface AddBeanRemote {public int add(int a, int b); } |
and the source code of the bean, which implements the previous interface:
package ejbs;
/**
* Session Bean implementation class AddBean
*/
@Stateless
public class AddBean implements AddBeanRemote {return a + b; } } |
Now, it's time to deploy. We will run the server on a console and export the .jar file. Running everything inside Eclipse is also an option. To export the jar file to deploy the project, you may use the right button of the mouse and do as in the following figures:


Once you press "Finish" you should see the following on the JBoss console. If you didn't yet start JBoss you can do it by running the ./standalone.sh (or .bat) script file on the bin directory:

You should also see the following result in the deployment directory:

To undeploy this project, you may just delete the .deployed file from this directory.
Now, let's get back to the names WildFly displays on the console. We will need these names in our client application. For this application, we will use just another standard Java project. For that, you may even change the perspective back to Java and then you need to create a Java Project:


and a Java class:

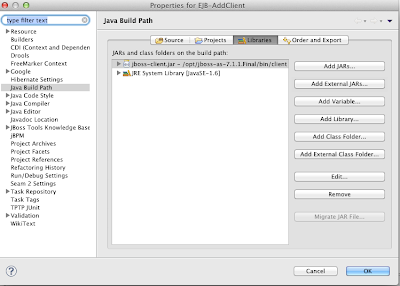
After you click finish, we need to configure the build path:

To include the EJB project and a jar file called "jboss-client.jar". The former contains the Java definitions of the bean that we must use. The latter contains the classes that allow the client to use JNDI to get the stub of the EJB. To add the project, pick the "Projects" tab:

Now, "Add External JARs..." in the Libraries tab. The jar is in the bin/client folder of WildFly. Its name is "jboss-client.jar":
The following piece of code is the main class:
import javax.naming.InitialContext;
import javax.naming.NamingException;
import ejbs.AddBeanRemote;
public class PlayAddBean {
/**
* @param args
* @throws NamingException
*/
public static void main(String[] args) throws NamingException {
AddBeanRemote addbean = (AddBeanRemote) InitialContext.doLookup("EJB-Add/AddBean!ejbs.AddBeanRemote");
System.out.println("3 + 2 = " + addbean.add(3, 2));
System.out.println("Very impressive!");
}
|

This is the jndi.properties file. Note that you should change the username and password to match your own case. This file sets the behavior of the InitialContext object we create in the main() method. E.g., it will tell how to create the JNDI client, where is the server (machine and port), etc.:
java.naming.factory.initial=org.jboss.naming.remote.client.InitialContextFactory
java.naming.provider.url=http-remoting://localhost:8080
jboss.naming.client.ejb.context=true
|
As we run the client, we get the following result:

Simple and easily understandable... Thank you Very Much!
ReplyDeleteThank You Very Much.....!!!
ReplyDeleteWhy my 'import ejbs.AddBeanRemote' show error, I have add jar jboss-client.jar
ReplyDeleteIt's probably due to the lack of the the EJB-Add project in the java build path (it is in one of the pictures above).
Deletewhere src folder. i do not see that to create the jndi client with below code
ReplyDeletejava.naming.factory.initial=org.jboss.naming.remote.client.InitialContextFactory
java.naming.provider.url=http-remoting://localhost:8080
jboss.naming.client.ejb.context=true
The src folder is the folder where the packages with the source code are. In Eclipse you should usually see it on the left side of the screen, in the Project Explorer tab.
ReplyDeleteCongratulations guys, quality information you have given!!!..Its really useful blog. Thanks for sharing this useful information
ReplyDeleteVery informative ..i suggest this blog to my friends..Thank you for sharingjava training in chennai | java training institutes in chennai