Let me refer to this tutorial
here. I didn't follow it entirely, but I took advantage of the EclipseLink persistence.xml file it contains.
The first thing you need to do is to create a JPA Project, as follows:
Next, you need to initialize the JPA project, as this:
Press the Next button until you reach the following screen:
Since we are using the EclipseLink as the Persistence provider, your
persistence.xml in the Eclipse project should look like the following. There is a reference to a common.Student class, which I will present later on. Note that you may have to change the url, the driver, the user name and the password according to your needs. You may also want to change the table generation policies.
Another remark: this will only work for a stand-alone project. I propose a different version of
persistence.xml if you want JPA to work from the JBoss application server (ahead).
<?xml version="1.0" encoding="UTF-8" ?>
<persistence xmlns:xsi="http://www.w3.org/2001/XMLSchema-instance"
xsi:schemaLocation="http://java.sun.com/xml/ns/persistence http://java.sun.com/xml/ns/persistence/persistence_2_0.xsd"
version="2.0" xmlns="http://java.sun.com/xml/ns/persistence">
<persistence-unit name="TestPersistence" transaction-type="RESOURCE_LOCAL">
<class>common.Student</class>
<properties>
<property name="javax.persistence.jdbc.driver" value="com.mysql.jdbc.Driver" />
<property name="javax.persistence.jdbc.url" value="jdbc:mysql://localhost:3306/StudentDB" />
<property name="javax.persistence.jdbc.user" value="artur" />
<property name="javax.persistence.jdbc.password" value="fonseca" />
<!-- EclipseLink should create the database schema automatically -->
<property name="eclipselink.ddl-generation" value="create-tables" />
<property name="eclipselink.ddl-generation.output-mode"
value="database" />
</properties>
</persistence-unit>
</persistence>
|
Next, we need to add the MySQL driver in the eclipse project. I'm using my-sql-connector-java-5.1.19-bin.jar. You may want to use some other version (e.g. more recent, when it arrives). Just create a new folder, name it
lib (the name doesn't really matter) and copy the jar file into it. Then use the context menu of the mouse over the my-sql-connector-java-5.1.19-bin.jar file and add it to the Build Path (Build Path-->Add to Build Path). Now, your project should already have access to the MySQL driver.
Before we write anything to the database, we need to define the classes that will hold our data. These will belong to the common package. Note that the Student class is ready for "JPA time", as it already contains all the annotations.
package common;
import java.io.Serializable;
import javax.persistence.Column;
import javax.persistence.Entity;
import javax.persistence.GeneratedValue;
import javax.persistence.GenerationType;
import javax.persistence.Id;
import javax.persistence.Table;
/**
*
* @author filipius
*/
@Entity
@Table(name = "STUDENTS_TABLE")
public class Student implements Serializable {
private static final long serialVersionUID = 1L;
//we use this generation type to match that of SQLWriteStudents
@Id
@GeneratedValue(strategy = GenerationType.IDENTITY)
@Column(name = "studentid")
private Long id;
private String name;
private String phone;
public Student() {}
public Student(String name, String phone) {
this.name = name;
this.phone = phone;
}
public Long getId() {
return id;
}
public void setId(Long id) {
this.id = id;
}
public String getName() {
return name;
}
public void setName(String name) {
this.name = name;
}
public String getPhone() {
return phone;
}
public void setPhone(String phone) {
this.phone = phone;
}
@Override
public int hashCode() {
int hash = 0;
hash += (id != null ? id.hashCode() : 0);
return hash;
}
@Override
public boolean equals(Object object) {
// TODO: Warning - this method won't work in the case the id fields are not set
if (!(object instanceof Student)) {
return false;
}
Student other = (Student) object;
if ((this.id == null && other.id != null) || (this.id != null && !this.id.equals(other.id))) {
return false;
}
return true;
}
@Override
public String toString() {
return "Student " + id + ": " + name + " " + phone;
}
}
|
package common;
import java.util.ArrayList;
import java.util.List;
import java.util.Scanner;
public class GetStudentInfo {
static List<Student> list;
public static List<Student> get() {
list = new ArrayList<Student>();
boolean done = false;
Scanner sc = new Scanner(System.in);
while (!done) {
System.out.println("Student's name (empty to finish): ");
String name = sc.nextLine();
done = name.equals("");
if (!done) {
System.out.println("Student's phone: ");
String phone = sc.nextLine();
list.add(new Student(name, phone));
}
}
return list;
}
}
|
I will access the database using two different forms, for comparison purposes: 1) using standard SQL; 2) using JPA. Furthermore, they will interoperate. Let's start with SQL. Before that I include a picture with the entire structure of the Eclipse project to help you out:
Now, the class that writes to the database, using SQL:
package sql;
import java.sql.DriverManager;
import java.sql.ResultSet;
import java.sql.SQLException;
import java.util.List;
import com.mysql.jdbc.Connection;
import com.mysql.jdbc.Statement;
import common.GetStudentInfo;
import common.Student;
public class SQLWriteStudents {
final static String name = "artur";
final static String password = "fonseca";
final static String tablename = "STUDENTS_TABLE";
public static void main(String[] args) throws SQLException {
String url = "jdbc:mysql://localhost:3306/StudentDB";
Connection conn = (Connection) DriverManager.getConnection(url, name, password);
Statement stmt = (Statement) conn.createStatement();
String sql = "show tables like '" + tablename + "'";
ResultSet rs;
rs = stmt.executeQuery(sql);
if (!rs.first()) { //create the table
sql = "CREATE TABLE " + tablename + "(studentid BIGINT NOT NULL AUTO_INCREMENT, Name VARCHAR(254), Phone VARCHAR(20), PRIMARY KEY (studentid))";
stmt.executeUpdate(sql);
}
List<Student> mylist = GetStudentInfo.get();
int rows = 0;
for (Student st : mylist) {
sql = "INSERT INTO " + tablename
+ "(Name, Phone)"
+ "VALUES"
+ "('" + st.getName() + "','" + st.getPhone() + "')";
rows += stmt.executeUpdate(sql);
}
System.out.println("Added " + rows + " students.");
}
}
|
It should already work. Start the MySQL server, and create the database (StudentDB). In the following figure, I added two students to the database. You can go directly to the mysql interface in the command line to check if these students entered the database, once the program finishes.
Let's do that programmatically, as well:
package sql;
import java.sql.DriverManager;
import java.sql.ResultSet;
import com.mysql.jdbc.Connection;
import com.mysql.jdbc.Statement;
public class SQLReadStudents {
final static String name = "artur";
final static String password = "fonseca";
public static void main(String[] args) {
try {
String url = "jdbc:mysql://localhost:3306/StudentDB";
Connection conn = (Connection) DriverManager.getConnection(url, name, password);
Statement stmt = (Statement) conn.createStatement();
ResultSet rs;
rs = stmt.executeQuery("SELECT * FROM STUDENTS_TABLE");
while (rs.next()) {
Long id = rs.getLong("studentid");
String nme = rs.getString("Name");
String phone = rs.getString("Phone");
System.out.println(id + ": " + nme + " " + phone);
}
conn.close();
} catch (Exception e) {
System.err.println("Got an exception! ");
System.err.println(e.getMessage());
}
}
}
|
The result is the following:
But the real motivation for this blog entry was JPA. Therefore, let's write two correspondent classes, one to write, the other to read from the Student Database (table STUDENTS_TABLE, as you can see from the Student entity class above).
package jpa;
import common.Student;
import common.GetStudentInfo;
import java.util.List;
import javax.persistence.EntityManager;
import javax.persistence.EntityManagerFactory;
import javax.persistence.EntityTransaction;
import javax.persistence.Persistence;
public class JPAWriteStudents {
public static void main(String[] args) {
List<Student> mylist = GetStudentInfo.get();
EntityManagerFactory emf = Persistence.createEntityManagerFactory("TestPersistence");
EntityManager em = emf.createEntityManager();
EntityTransaction tx = em.getTransaction();
tx.begin();
for (Student st : mylist)
em.persist(st);
tx.commit();
//after commit we have ids:
for (Student st : mylist)
System.out.println(st);
}
}
|
We can add new students, running this program:
And let's read the database:
package jpa;
import common.Student;
import java.util.List;
import javax.persistence.EntityManager;
import javax.persistence.EntityManagerFactory;
import javax.persistence.Persistence;
/**
*
* @author filipius
*/
public class JPAReadStudents {
public static void main(String args[]) {
EntityManagerFactory emf = Persistence.createEntityManagerFactory("TestPersistence");
EntityManager em = emf.createEntityManager();
String query = "SELECT s FROM Student s";
@SuppressWarnings("unchecked")
List<Student> mylist = (List<Student>) em.createQuery(query).getResultList();
for (Student st : mylist)
System.out.println(st);
}
}
|
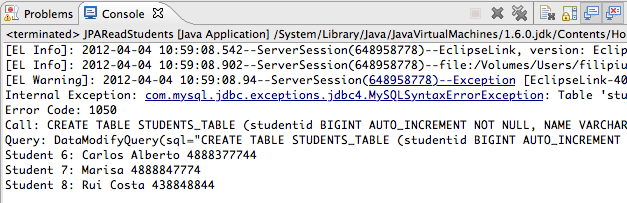
We got the following after we run this class:
I would lie to you if I said something like "pretty easy, hum?". Although JPA allows code to be shorter and more readable, the knobs and bolts of JPA may keep the newbie away. I find all the configuration details pretty obscure, and I lost countless hours, to have this straight, both as a standalone project and as part of a JBoss deployed project. To help you a little bit with this, let me add a
persistence.xml file that is working for me in a JPA project, which is part of an EAR. A major difference is that the provider is, in this case, an hibernate class, which exists somewhere in the JBoss AS libraries.
<?xml version="1.0" encoding="UTF-8"?>
<persistence version="2.0"
xmlns="http://java.sun.com/xml/ns/persistence" xmlns:xsi="http://www.w3.org/2001/XMLSchema-instance"
xsi:schemaLocation="http://java.sun.com/xml/ns/persistence http://java.sun.com/xml/ns/persistence/persistence_2_0.xsd">
<persistence-unit name="Proj2-JPA" transaction-type="JTA">
<provider>org.hibernate.ejb.HibernatePersistence</provider>
<jta-data-source>java:jboss/datasources/MySqlDS</jta-data-source>
<class>medicos.Medico</class>
<properties>
<property name="hibernate.dialect" value="org.hibernate.dialect.MySQLDialect" />
<property name="hibernate.hbm2ddl.auto" value="create" />
<property name="javax.persistence.jdbc.driver" value="com.mysql.jdbc.Driver"/>
<property name="javax.persistence.jdbc.url" value="jdbc:mysql://localhost:3306/Proj2DB"/>
<property name="javax.persistence.jdbc.user" value="artur"/>
<property name="javax.persistence.jdbc.password" value="fonseca"/>
</properties>
</persistence-unit>
</persistence>
|


