Monday, April 15, 2013

Web Service with JAX-WS 2.2.4

(I have a post that supersedes this one here)

In this message I will create a very simple web service and respective client using the JAX-WS technology. I will deploy the web service on JBoss AS 7.1.1 and use Eclipse. NetBeans instead of Eclipse and other application server might do the trick equally well. First, let us start JBoss. Just cd to the bin directory and run it as follows:

./standalone.sh (standalone.bat if you are using Windows)

We must create a new dynamic web project:


Give it a name. Let us call it WSAgenda (you should not get any warning over the name repetition) and press the Finish button.


I will first create the PhoneBookServer class (File-> New -> and look for class).


Notice that we selected the package ws:
package ws;

import java.util.Hashtable;
import java.util.Map;

import javax.jws.WebMethod;
import javax.jws.WebService;

@WebService
public class PhoneBookServer {
static private Map<String, String> phonebook = new Hashtable<>();
public PhoneBookServer() {
}
@WebMethod
public String getNumero(String nome) throws NoSuchPersonException {
if (!phonebook.containsKey(nome))
throw new NoSuchPersonException();
return phonebook.get(nome);
}
@WebMethod
public void setNumero(String nome, String numero) {
phonebook.put(nome, numero);
}
}


We will also create an exception class, for the case where the person looked for is not registered:

package ws;

public class NoSuchPersonException extends Exception {

private static final long serialVersionUID = 1L;

}

Note that we use a static hash table to keep the phone, because multiple objects of type PhoneBookServer may coexist for performance reasons. It would not make sense to have multiple server objects seeing different phone books and giving different replies to clients. One should also notice that the server has no numbers and that the client needs to add them.

To deploy the server, select the name of the project (WSPhoneBook on the left side) and do as follows with the right button of the mouse:


Then we set the name of the war file:


If things went well you should see the following trace in the JBoss window:


You should check the address in the 6th line, add "?wsdl" to it and put it in the browser:

http://localhost:8080/PhoneBook/PhoneBookServer?wsdl

You should see this:


The server is ready, let us write the client.

We first need to have stubs, to invoke the web services. But before we can do that we need to create a regular Java project. Let us call it WSClient. Now, find the directory where Eclipse writes the source files of this project. In my case it is long-path-to-workspace/WSClient/src/. Do

cd long-path-to-workspace/WSClient/src/

with the necessary differences in the Windows operating system. We must run the wsimport command with an option to keep java files and with a package that might be "artifact". Note that this command may not exist in your path. Two typical problems: 1) you installed a JRE instead of a JDK; 2) the bin directory of the JDK is not in your path. You may overcome problem 2 by indicating the complete path to the wsimport command.


We will now go to Eclipse to create Client and Client2 java classes, to write and read numbers to/from the phone book. Press F5 or use the right button to refresh. You should see your own classes and the stubs, as well.


Client should be like this:
import artifact.PhoneBookServer;
import artifact.PhoneBookServerService;


public class Client {

/**
* @param args
*/
public static void main(String[] args) {
PhoneBookServerService as = new PhoneBookServerService();
PhoneBookServer asp = as.getPhoneBookServerPort();
asp.setNumero("Paula", "234523452345");
asp.setNumero("Heloisa", "111111111111");
}

}


Run it. Client2 should be like this:

import artifact.NoSuchPersonException_Exception;
import artifact.PhoneBookServer;
import artifact.PhoneBookServerService;


public class Client2 {

/**
* @param args
* @throws NoSuchPersonException_Exception 
*/
public static void main(String[] args) throws NoSuchPersonException_Exception {
PhoneBookServerService as = new PhoneBookServerService();
PhoneBookServer asp = as.getPhoneBookServerPort();
System.out.println("Numero da Paula " + asp.getNumero("Paula"));
System.out.println("Numero da Heloisa " + asp.getNumero("Heloisa"));
System.out.println("Numero da Carla " + asp.getNumero("Carla"));
}

}


What a pity! The server does not really have the number of Carla, so we will get an exception when we try this program. So, these red letters are a god sign in our case. Everything went as expected:


Tuesday, December 4, 2012

Some hints about Assignment #3 - 2012/13

I'm afraid that web services are not working properly with version 4.11 server. Please try 4.10, but don't delete 4.11, as it has useful examples. The following are only suggestions, if you think of a simpler solution you are allowed (and encouraged) to use it:

1 - Unmarshall XML: use smooks.
2 - Splitter and Aggregator. You may write your own splitter. Check the streaming_aggregator example, the java class IncomingComposer (version 4.11). The difference as I explained in the class is that there is no final message to count the previous ones. Each message carries the total number of messages.
3 - Process details: check bpm_orchestrator4 (and the easier ones 1,2 and 3 before).
4 - Make the process reply: use <property name="reply-to-originator" value="true" /> in the action <action class="org.jboss.soa.esb.services.jbpm.actions.BpmProcessor" name="..."> of jboss-esb.xml. This requires that the process also uses <action class="org.jboss.soa.esb.services.jbpm.actionhandlers.EsbNotifier"> at some point (typically in the end). Again, this is done in the aforementioned examples (bpm_orchestrator4).
5 - Creation of web services and utilization as wrappers of the EJBs: in this blog message.
6 - Invoke web services: see example webservice_consumer1 (we may also see the others and use their approaches). You may also want to take a look at webservice_producer.

Don't forget to download the Programmers guide, from here.

Monday, November 19, 2012

The HelloWorld in the JBoss Enterprise Service Bus

INSTALLING JBOSS ESB

Let's start by istalling JBoss ESB. First the bad news: we can't use JBoss AS 7. We have two options, both of them with their own problems. Either we install (the full blown) JBoss ESB server version 4.11 or we need to revert to JBoss AS 6 and install the ESB (non-server) 4.11 on top of it.

(Option 1) It is easier to download and install the standalone server JBoss ESB distribution. However, it uses a pretty old JBoss distribution, the 4.2.3, at the time I write this document. This means that many of the code you have in Java EE may not run there.

(Option 2) If you go for the other option, JBoss AS 6 is available here. Pick the last one (6.1.0.Final). You can find the JBoss ESB server distributions here. Pick the one that is not server: jbossesb-4.11.zip. The documentation, which you can find here, explains how to install JBoss ESB into the JBoss AS 6 you downloaded. I found it simple and it the installation worked pretty well to me. Unfortunately, I never managed to run the bpm_orchestration3 example that comes with the code (the web interface crashes), something you will need to do in EAI. So, if this example do not work for you either, you should go for Option 1.

INSTALLING JBOSS DEVELOPER STUDIO

Next, we need to install the JBoss Developer Studio (JDS) IDE enriched with the SOA tooling. This may not be entirely trivial to do. For me it was hard to find a location from where to download the SOA tooling. Moreover, you must register on the RedHat site to download JDS.

At least in theory you may do similar steps to use plain Eclipse plus some plug-ins. Nevertheless, it is certainly easier to install JDS and SOA Tooling. Check these sites:
Jboss Developer Studio 5.x
SOA Tooling

This latter web page didn't work well for me. I had to download a zip to my local disk and use the Help->Install New Software menu of the JDS and point it to the location of the contents I downloaded to get the following image:


THE HELLOWORLD ESB PROJECT

Now, if everything went smoothly, we should be able to create an ESB project. Take a look at the jbossesb-server-4.11/samples directory and to the "helloworld" project. We will make a copy of it using JDS. Go to the File menu, pick "New" and look for ESB. You should get to this point:


You may want to set up the JBoss ESB for the project as well (by clicking next and next again):

The samples/helloworld example contains three java source files. Copy the MyJMSListenerAction.java to your JDS project.

You will also need the "jobss-esb.xml" file. Copy it into the "esbcontent/META-INF" folder. Don't be afraid to overwrite the file with the same name that was there before. Two more files:
deployment.xml, which contains a list of JMS queues required, and jam-queue-service.xml (Option 1 above) or hornetq-jms.xml (Option 2), which instructs JBOSS to create those queues. The "deployment.xml" goes to the "esbcontent/META-INF" directory, while the latter goes to the "esbcontent" directory. The organization of the files should look like this:

(Option 1)

or
(Option 2)

In Option 2, the file deployment.xml must change to look as follows, otherwise do not touch it:

<?xml version="1.0" encoding="UTF-8"?>
<jbossesb-deployment>
 <depends>org.hornetq:module=JMS,type=Queue,name="quickstart_helloworld_Request_esb"</depends>
 <depends>org.hornetq:module=JMS,type=Queue,name="quickstart_helloworld_Request_gw"</depends>
</jbossesb-deployment>


So, let's deploy the project, by taking the following steps:

Then:

 And finally (pick your own directory):

Check the URL http://localhost:8080/contract/ to see whether the service is running, as you can see in the lowest box of the following figure:

THE CLIENT PROJECT - USING JMS

Everything that follows was tried only for Option 1 above. For Option 2 slight changes may apply. Let us just use a standard Java Project. Go to File-->New and then you may either see the option to create a Java Project, or you may need to pick "Other":

You may call it the HelloWorldClient. To work on this project, you should change the perspective on the right upper corner to Java (this is not mandatory). Copy the two files SendJMSMessage.java and SendEsbMessage.java to the "src" folder of the project. Again, these files are in the samples/quickstarts/helloworld example. After you move everything to the appropriate package, you should still see library problems:

You need a lot of external jar files and a library to solve the JMS related problems. Include all the jar files in the following directories (this will be necessary for directly sending an ESB message):

$JBOSS_HOME/server/default/deploy/jboss-aop-jdk50.deployer
$JBOSS_HOME/server/default/lib/
$JBOSS_HOME/client/

I should say that at some point I had to make sure to include the jboss-messaging.jar before the jbossall-client.jar. But you should not need to do this.

To add the Library just press the "Add Library..." button, when you are managing the build path:


You may either find the following window or you may have to push the "Manage ESB Runtimes". In the latter case you should point to the home of your jboss, $JBOSS_HOME, to come back to this window with an option to select:

All project errors should go, once you finish this step. Now, let us start by firing the service via the JMS gateway queue. You need to set the parameters of SendJMSMessage, as follows:

Let us say "Hello":

And the result on the console of JBoss should be the following:


THE CLIENT PROJECT - USING ESB ASYNCHRONOUS DELIVERY

Now, let us invoke the ESB service directly, without resorting to JMS. This can be tricky, due to configuration problems. 

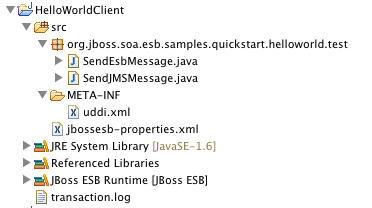
First, we need to create a folder name META-INF with the uddi.xml file inside. This file is in the samples/quickstarts/conf/registry/META-INF. You also need the jbossesb-properties.xml, which is in the helloworld directory. The tree should look as follows:


Check your source folders, to ensure that JDS did not exclude the META-INF folder. The next figure shows that no folder is excluded:


We will now run the SendEsbMessage class. Look at the arguments:


They match the service category and name that we defined in the server project, in the file jboss-esb.xml. You can also find them here: http://localhost:8080/contract/.


Once you run this, the JBoss console should display signs of your activity displaying a friendly "HelloESBWorld".

Friday, October 26, 2012

Using a Message-Driven Bean in JBoss 7

Let me describe the environment where this example runs: I assume that we will deploy a EJB in JBoss 7, and this JBoss includes an implementation of a queueing system accessible via Java Message Service. Additionally, I assumes that we already configured a queue named queue/PlayQueue. Refer to my other message about the Java Message Service for details on how to configure such queue. Again, we need to start JBoss in the following way, to start the messaging system:


./standalone.sh --server-config=standalone-full.xml


We now can write the code of the Message Bean. It is actually quite simple. Pick the Java EE perspective on the upper right corner of Eclipse. Then, create a new EJB Project (File-->New menu). Here I only show the source code of the bean in a Java package named message. The most important and not-so-obvious details concern the annotation @MessageDriven:


package message;

import javax.ejb.ActivationConfigProperty;
import javax.ejb.MessageDriven;
import javax.jms.JMSException;
import javax.jms.Message;
import javax.jms.MessageListener;
import javax.jms.TextMessage;

/**
 * Message-Driven Bean implementation class for: MyBean
 *
 */
@MessageDriven(
activationConfig = {
@ActivationConfigProperty(propertyName = "destinationType", propertyValue = "javax.jms.Queue"),
@ActivationConfigProperty(propertyName = "destination", propertyValue = "queue/PlayQueue")
},
mappedName = "queue/PlayQueue")
public class MyBean implements MessageListener {

    /**
     * Default constructor. 
     */
    public MyBean() {
    }
/**
     * @see MessageListener#onMessage(Message)
     */
    public void onMessage(Message message) {
    try {
System.out.println("Recebi: " + ((TextMessage) message).getText());
} catch (JMSException e) {
e.printStackTrace();
}
    }

}

To export the project to JBoss we do as usual:

The project in the form of a .jar file goes to standalone/deployments directory of JBoss:

You can now check the output of JBoss to see if everything went smoothly.

And now we need a program to send a message:


import javax.jms.Connection;
import javax.jms.ConnectionFactory;
import javax.jms.Destination;
import javax.jms.JMSException;
import javax.jms.MessageProducer;
import javax.jms.Session;
import javax.jms.TextMessage;
import javax.naming.NamingException;


import org.hornetq.api.core.TransportConfiguration;
import org.hornetq.api.jms.HornetQJMSClient;
import org.hornetq.api.jms.JMSFactoryType;
import org.hornetq.core.remoting.impl.netty.NettyConnectorFactory;


public class Sender {
private ConnectionFactory cf;
private Connection c;
private Session s;
private Destination d;
private MessageProducer mp;

public Sender() throws NamingException, JMSException {
TransportConfiguration transportConfiguration =
new TransportConfiguration(NettyConnectorFactory.class.getName());              
cf = (ConnectionFactory) HornetQJMSClient.createConnectionFactoryWithoutHA(JMSFactoryType.CF,transportConfiguration);
c = cf.createConnection("joao", "pedro");
d = HornetQJMSClient.createQueue("PlayQueue");

this.s = this.c.createSession(false, Session.AUTO_ACKNOWLEDGE);
this.c.start();
this.mp = this.s.createProducer(this.d);
}

public void send(String contents) throws JMSException {
TextMessage m = this.s.createTextMessage();
m.setText(contents);
this.mp.send(m);
}

public void close() throws JMSException {
this.c.close();
}
public static void main(String[] args) throws NamingException, JMSException {
Sender s = new Sender();
s.send("Ola");
}

}

Once you execute this code you should get the following view or similar in JBoss' console:

Wednesday, September 26, 2012

A few variations over JMS

PREVIOUS NOTE: Although not deprecated, as this example should work just fine with Java EE 7, I would consider the asynchronous receiver example in this message to be obsolete. I would advise the reader to consider this message instead.

In this message, I will provide a few examples that slightly change a sender-receiver synchronous interaction. In the basic example, the sender just sends a simple message, "OH OH OH", and the receiver just prints it. You should notice that the message goes through the JBoss Message Provider. For these examples to run you need to register a user, set up the queue and start the provider, just as I showed in "Java Message Service with JBoss AS 7". We will change this basic example to create:

The Basic Case

To get a sender look here (and a synchronous receiver): Java Message Service with JBoss AS 7.

The Asynchronous Receiver

Let us now change the Receiver to get messages asynchronously. One should notice that the main thread needs to be put on halt, or otherwise it will leave and kill the daemon thread of the session that is waiting for the message. The main difference is that the Receiver class now implements the MessageListener interface. When you run this receiver you should press enter in the console to finish it. The sender goes unchanged.


import java.io.IOException;

import javax.jms.Connection;
import javax.jms.ConnectionFactory;
import javax.jms.Destination;
import javax.jms.JMSException;
import javax.jms.Message;
import javax.jms.MessageConsumer;
import javax.jms.MessageListener;
import javax.jms.Session;
import javax.jms.TextMessage;
import javax.naming.InitialContext;
import javax.naming.NamingException;


public class Receiver2 implements MessageListener {
private ConnectionFactory cf;
private Connection c;
private Session s;
private Destination d;
private MessageConsumer mc;

public Receiver2() throws NamingException, JMSException {
InitialContext init = new InitialContext();
this.cf = (ConnectionFactory) init.lookup("jms/RemoteConnectionFactory");
this.d = (Destination) init.lookup("jms/queue/PlayQueue");
this.c = (Connection) this.cf.createConnection("joao", "pedro");
this.c.start();
this.s = this.c.createSession(false, Session.AUTO_ACKNOWLEDGE);
mc = s.createConsumer(d);
mc.setMessageListener(this);
}

@Override
public void onMessage(Message msg) {
TextMessage tmsg = (TextMessage) msg;
try {
System.out.println(tmsg.getText());
} catch (JMSException e) {
// TODO Auto-generated catch block
e.printStackTrace();
}
}

private void close() throws JMSException {
this.c.close();
}


/**
* @param args
* @throws JMSException 
* @throws NamingException 
* @throws IOException 
*/
public static void main(String[] args) throws NamingException, JMSException, IOException {
Receiver2 r = new Receiver2();
System.in.read();
r.close();
}


}


ReplyTo and Temporary Destinations

Let us now play with the replyTo plus a temporary destination. The sender creates a queue where the receiver should send its reply to. I include only the code of the sender and the receiver that changes, starting from the sender.


Session s = c.createSession(false, Session.AUTO_ACKNOWLEDGE);
MessageProducer mp = s.createProducer(d);
TextMessage msg = s.createTextMessage();
Destination replyto = s.createTemporaryQueue();
msg.setJMSReplyTo(replyto);
msg.setText("OH OH OH");
mp.send(msg);
MessageConsumer mc = s.createConsumer(replyto);
TextMessage reply = (TextMessage) mc.receive();
System.out.println("Sender got back: " + reply.getText());
c.close();

The receiver:


Session s = c.createSession(false, Session.AUTO_ACKNOWLEDGE);
MessageConsumer mc = s.createConsumer(d);
TextMessage msg = (TextMessage) mc.receive();
System.out.println(msg.getText());
TextMessage reply = s.createTextMessage(msg.getText() + " to you too my friend!");
MessageProducer mp = s.createProducer(msg.getJMSReplyTo());
mp.send(reply);

c.close();


Durable Subscriptions


You need to do a few changes to make a durable subscription. First, you need to give an id to the connection, as follows (only the second line is new):


c = cf.createConnection("joao""pedro");
c.setClientID("joao");

To create an appropriate message consumer you need to do as follows. This is pretty much the same as you used to do with a regular message consumer, except that you need to add a subscriptionid (a regular string):

MessageConsumer mconsumer = s.createDurableSubscriber(topic, subscriptionid);
This means that the clientid is independent of the identifier of the subscription (presumably, the client can have multiple durable subscriptions, although I didn't explicitly tried).

We also need to allow the role "guest" to make durable subscriptions. For this we edit the standalone-full.xml file (see my previous post). Note the lines with the "durable" word in it:

                <security-settings>
                    <security-setting match="#">
                        <permission type="send" roles="guest"/>
                        <permission type="consume" roles="guest"/>
                        <permission type="createNonDurableQueue" roles="guest"/>
                        <permission type="deleteNonDurableQueue" roles="guest"/>
                        <permission type="createDurableQueue" roles="guest"/>
                        <permission type="deleteDurableQueue" roles="guest"/>
                    </security-setting>
                </security-settings>

Now, just restart the JBoss AS 7.


Filtering


Let us again consider sending a message. The server can add a set*Property to the message to provide additional hints for the receiver to filter. Hence, just add a single line to the original sender:

TextMessage msg = s.createTextMessage();
msg.setText("OH OH OH");
msg.setLongProperty("Idade", 15);
mp.send(msg);

The receiver needs to add a filter like this, at the time it creates the consumer:

MessageConsumer mc = s.createConsumer(d, "Idade < 80");

You can now play with the ages on the sender and receiver sides. One obvious question is: when the receiver filters out the message, does the message provider keep it? Or should we lose the message for ever? E.g., assume that we don't care for any age above 45, but the sender sends a 46. Will we get this 46, once we change the receiving filter to 50?


Transactions


Finally the transactions, starting again from the server (go back to the original example, once again):


Session s = c.createSession(true, 0);
MessageProducer mp = s.createProducer(d);
TextMessage msg = s.createTextMessage();
msg.setText("OH OH OH");
mp.send(msg);
s.commit();
c.close();


The receiver:


Session s = c.createSession(true, 0); 
MessageConsumer mc = s.createConsumer(d);
TextMessage msg = (TextMessage) mc.receive();
System.out.println(msg.getText());
s.commit();
c.close();

To fully explore this example, you may want to do the following: delete the commit of the receiver and send one message. Run the receiver over and over again. It will always get the message. Restore the commit on the receiver and delete the commit on the server side. Now, you will see that the message never gets to the receiver.